Follow the Instructions:
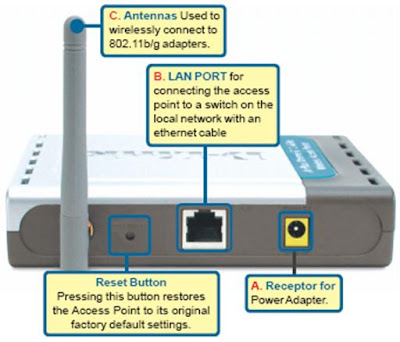
- Connect the power adapter to the receptor and plug the other end of the power adapter to a wall outlet or power strip. The power LED will turn ON to indicate proper operation.
- Insert one end of the cable to the ethernet port on the back panel and the other end of the cable to the computer that will be used for configuration or to the local network.
- Assign a static IP adress for your computer (The IP Address must be within the same range as the access point. The IP Adress of the Access Point (DWL-2100AP) is 192.168.0.50, you can assign192.168.0.67 for your computer). Assign a subnet mask of 255.255.255.0. (look picture).
- Open Your browser and type 192.168.0.50 into the URL address box [enter].
- Type "admin" for the username and leave the password field blank [Click OK].
- Once you have logged in, the Home screen will appear [Click Run Wizard].
- You will see the following screen [next].Insert your password and verify [next].
- Type yor SSID as you like [next].
- Insert your password for WEP [next].
- Click [restart] for save reboot your setting.Click [close].
- Enjoy


